


Cacti is an open-source, web-based network monitoring tool that generates graph data of CPU usage, memory usage, network bandwidth utilization, and more.
With the help of RRDtool (Round-Robin database tool), Cacti can graph time-series data such as CPU load and network bandwidth utilization using SNMP protocol.
In this article, we will show you how to install Cacti 1.2.0 manually in CentOS 7.
Prerequisites
– You have “root” or “sudo” access to a fresh CentOS 7 system.
1. Install LAMP
Since Cacti is written in PHP, you need to setup LAMP or LEMP stack before proceeding with installing Cacti.
So let us proceed with installing the LAMP (Linux, Apache, MySQL & PHP) stack starting with Apache:
1.1 Install Apache
Update the system and install Apache with following command:
# yum update
# yum install httpd
Enable Apache during system reboot and start it.
# systemctl enable httpd
# systemctl start httpd
If firewall is enabled in your system then open the port number 80 in the firewall settings so that traffic can pass through it.
# firewall-cmd --zone=public --add-port=80/tcp --permanent
# firewall-cmd --reload
1.2 Install MariaDB
Install MariaDB which is a fork of MySQL using following “yum” command:
# yum install mariadb-server
Run the following commands to start MariaDB and enable it to start automatically during system boot.
# systemctl start mariadb
# systemctl enable mariadb
To secure your freshly installed MariaDB server, use the following script. The script will prompt you for updating root password, remove anonymous users, test database and disallow root login remotely.
You should answer “Y” to complete the step of securing the MariaDB instance.
# mysql_secure_installation
MariaDB installation is complete, Proceed with installing php in the next step:
1.3 Install PHP
Cacti need PHP 5.3 or greater but from security and performance point of view, it is better to install the latest and stable version of PHP. Since the latest PHP version is not available with default CentOS repository, you need to install “EPEL” and “Remi” repository before proceeding with installing latest version of PHP.
The following “yum” commands will exactly install and enable the repositories needed for latest version of PHP:
# yum install epel-release yum-utils
# yum install http://rpms.remirepo.net/enterprise/remi-release-7.rpm
# yum-config-manager --enable remi-php73
# yum update
Now install the latest version of PHP along with all the required libraries with the following “yum” command and restart apache to reload settings for PHP.
# yum install php-mysql php-pear php-common php-gd php-devel php php-mbstring php-cli php-mysql php-gmp php-ldap php-snmp
# systemctl restart httpd
To check the version of installed PHP, run the following command:
# php -v
PHP 7.3.0 (cli) (built: Feb 10 2019 16:00:20) ( NTS )
Copyright (c) 1997-2019 The PHP Group
Zend Engine v3.3.0-dev, Copyright (c) 1998-2019 Zend Technologies
Now that php have been installed in your system, adjust few settings of it starting from timezone.
Edit the file “/etc/php.ini” and set the timezone as per your choice.
# vi /etc/php.ini
...
date.timezone = America/Chicago
...
...
Cacti also requires that the values for “memory_limit” and “max_execution_time” parameter of php to be >=400M and >=60s respectively.
Edit the “php.ini” file and adjust them accordingly.
# vi /etc/php.ini
...
...
memory_limit=400M
...
...
max_execution_time=60
...
...
Restart Apache to reload new settings:
# systemctl restart httpd
The LAMP stack along with few recommended values for PHP is configured in your system. Now proceed with configuring MariaDB database for Cacti in the next step.
1.4 Configure MariaDB for Cacti
In this step, we will create a MariaDB user and a database especially for Cacti. To start with, open a MariaDB shell and create a database and an user. You also need to grant all the privileges to the user over newly created database.
# mysql -u root -p
MariaDB [(none)]> CREATE DATABASE cacti_database;
Query OK, 1 row affected (0.01 sec)

MariaDB [(none)]> CREATE USER 'cacti_user'@'localhost' IDENTIFIED BY 'Passw0rd!';
Query OK, 0 rows affected (0.01 sec)

MariaDB [(none)]> ALTER DATABASE cacti_database CHARACTER SET utf8mb4 COLLATE utf8mb4_unicode_ci;
Query OK, 0 rows affected (0.01 sec)

MariaDB [(none)]> GRANT ALL PRIVILEGES ON cacti_database.* TO 'cacti_user'@'localhost';
Query OK, 0 rows affected (0.01 sec)

MariaDB [(none)]> GRANT select on mysql.time_zone_name to 'cacti_user'@'localhost' identified by 'Passw0rd!';

MariaDB [(none)]> FLUSH PRIVILEGES;
Query OK, 0 rows affected (0.01 sec)

MariaDB [(none)]> exit;
Bye

The Cacti version 1.0.1 and up also requires MariaDB timezone database to be populated apart from select access to the time_zone_name table in the mysql database.
We have already done with the second condition in the previous step. To populate the timezone database, run the following command from the terminal.
# mysql -u root -p mysql < /usr/share/mysql/mysql_test_data_timezone.sql
Cacti recommend adjusting few MariaDB environment variables for better performance. Edit the MariaDB server configuration files and place all the environment variables and their values in “server.conf” under “mysqld” section.
# vi /etc/my.cnf.d/server.cnf
...
...
[mysqld]
collation-server = utf8mb4_unicode_ci
init-connect='SET NAMES utf8mb4'
character-set-server = utf8mb4
max_heap_table_size = 128M
max_allowed_packet = 16777216
tmp_table_size = 64M
join_buffer_size = 64M
innodb_file_per_table = on
innodb_buffer_pool_size = 512M
innodb_doublewrite = off
innodb_additional_mem_pool_size = 80M
innodb_lock_wait_timeout = 50
innodb_flush_log_at_trx_commit = 2
...
...

Restart MariaDB to reload new configurations:
# systemctl restart mariadb
1.5 Install dependencies for Cacti
Cacti also need few dependencies like SNMP daemon and “rrdtool”.
The later is a database tool to manage and retrieve metrics for Network Bandwidth, CPU Load and more.
# yum install net-snmp net-snmp-utils rrdtool
Start and enable the SNMP daemon.
# systemctl enable snmpd
# systemctl start snmpd
2. Download and Configure Cacti
Cacti is available in EPEL repository, we can either install it using “yum” command or install it manually, in this step by step tutorial we are going to install using second method i.e. manually.
So head over to Cacti release page and download it. After successfully downloading the file extract it to the webroot of apache which is “/var/www/html” in our case.
# cd /var/www/html
# yum install wget
# wget https://www.cacti.net/downloads/cacti-1.2.0.tar.gz
# tar zxvf cacti-1.2.0.tar.gz
For an easy upgrade of Cacti at later stages, create a symbolic link to the extracted Cacti folder.
# ln -s cacti-1.2.0 cacti
Change the ownership of Cacti folder to webserver user i.e apache
# chown -R apache:apache /var/www/html/cacti-1.2.0
If SELINUX is enabled in your system then allow Apache to read and write couple of folders during install time only by disabling SELINUX momentarily and once installation is over, enable it again:
# setenforce 0
Cacti also need read and write permission for log and rrd files consistently once the installation is over.
Add the following SELINUX rules that allows read and write permission for the said folders since we are going to enable SELINUX again at later stage.
# chcon -t httpd_sys_rw_content_t /var/www/html/cacti-1.2.0/log -R
# chcon -t httpd_sys_rw_content_t /var/www/html/cacti-1.2.0/rra -R
Set a cron entry for apache for running the poller in every 5 minute. For more information see crontab examples.
# crontab -u apache -e
*/5 * * * * apache php /var/www/html/cacti-1.2.0/poller.php > /dev/null 2>&1
In the next step, import Cacti database schema. To do that, run the following command in the terminal.
You will be prompted to provide the password for the user “cacti_user” that we have created earlier.
# mysql -u cacti_user -p cacti_database < /var/www/html/cacti-1.2.0/cacti.sql
Now adjust few settings for Cacti in its configuration file:
# vi /var/www/html/cacti-1.2.0/include/config.php
...
...
$database_type = 'mysql';
$database_default = 'cacti_database';
$database_hostname = 'localhost';
$database_username = 'cacti_user';
$database_password = 'Passw0rd!';
$database_port = '3306';
$database_ssl = false;
$database_ssl_key = '';
$database_ssl_cert = '';
$database_ssl_ca = '';
...
...

3. Install Cacti
At this point, Cacti should be available in http://SERVER_IP/cacti, Follow the next few steps to complete the installation of Cacti.
- To start with, login with default username and password as admin/admin.

2. Cacti will ask you to change the password. Provide the current password as “admin” and a new password to proceed to the next step.
3. Choose a theme and the language of installation:
In this step the installer will check if all the required settings of php and MySQL are fulfilled or not:
4. Choose the installation type as New primary server:

5. If you have setup the directories permission properly in the earlier stages, then click next to proceed with the installation. Otherwise the installer will ask you to apply correct folder permission before proceeding with the next step.
6. In this step the installer will show you the path and version of binaries needed by Cacti. If there are any missing binaries, then install it from the terminal and once done refresh the installer page:

7. Setup a default profile and a network to continue with the installation:

8. Now setup the template and click “Next”

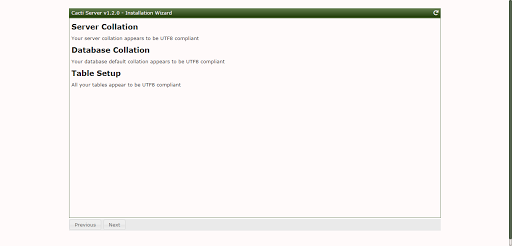
9. In this step, the installer will verify MariaDB database and server collation settings that you have applied earlier:
10. Tick “Confirm installation” to proceed with the installation, Wait for few seconds to complete the installation of Cacti.
11. At this stage installation of Cacti will be complete and you can view the process logs. Click ‘Get started’ and you will be redirected to the Cacti dashboard:

12. The installation of Cacti is over, Enable SELINUX again to make your CentOS 7 server secure.
# setenforce 1
Conclusion
In this article we have explored how to install Cacti on CentOS 7. You can now add devices or services to monitor the network bandwidth, load average, disk utilization through time series and interactive graph.
This cacti installation guide is applicable for both CentOS 6 and CentOS 7 or other Linux distros with very little or no changes in executing the commands. If you face any issues while installing the cacti on your vps/server, ask by leaving a comment below and we are happy to assists.


")


